
Dive - Into docker images

ยท One min read

Docker Image Layers

Usually when a developer looks into docker images docker image history <image-id> is used to understand each layer, size of each layer and other image.

Reducing image size is a common problem which is faced while building docker image and to overcome this problem we follow best practices like using multi stage build , using smaller base image, use && with RUN command to reduce number of layers.

DIVE is a tool which help in analysis of Image layers, Potential wasted Image, Image efficiency score. It help visualise each image layer and files added and modified in each layer.

It is supported on Windows, MacOs and Linux.

Various option of DIVE usage:

DIVE can also be integrated with CI tool to check if image passes highestUserWastedPercent (highest allowable percentage of bytes wasted), highestWastedBytes(highest allowable bytes wasted) and lowestEfficiency(lowest allowable image efficiency). If these criteria does not meet the expectation docker push to Docker Image repository will fail.

Integration will fail incase docker image does not meet the specified criteria.

DIVE can also be optimsed by placing .dive.yaml file in home directory.

Post 01 - Harbor High Availability deployment on Kubernetes

ยท 4 min read

In this post I will be covering details of deployment of Harbor High Availability on Bare Metal VM's. This will be a series of article covering

  1. Harbor High Availability deployment on Kubernetes (this post)

  2. Kubernetes Dynamic Provisioning - Persistent Volume on demand (Using helm charts)
    Kubernetes Dynamic Provisioning - Persistent Volume on demand (Using helm charts) \

  3. High available Redis (Using helm charts) \

  4. High available PostgreSQL database (Using helm charts)
    Post 04 - PostgreSQL High Availability deployment on Kubernetes \

  5. Harbor High Availability deployment in action on Kubernetes using helm chart. \

Harbor is an open source registry that secures artifacts with policies and role-based access control, ensures images are scanned and free from vulnerabilities, and signs images as trusted. Harbor, a CNCF Graduated project, delivers compliance, performance, and interoperability to help you consistently and securely manage artifacts across cloud native compute platforms like Kubernetes and Docker. - Source (Harbor.io)

Prerequisiteโ€‹

To install harbor using helm chart on Kubernetes cluster, we need to have

1) Kubernetes cluster 1.10+ :โ€‹

We need to have Kubernetes cluster. Refer my previous post for this - Bootstrap Kubernetes cluster with PV as NFS

2) Helm 2.8.0+ :โ€‹

I have installed helm in my local windows machine and using cluster config file from .kube folder to remotely connect to cluster. We can install helm chart on remote cluster using --kubeconfig parameter with value as path to config file. Eg: --kubeconfig=D:\kubernetes\config

3) High available PostgreSQL database :โ€‹

Harbor helm chart don't deploy PostgreSQL HA cluster and we need to pass IP address in values.yaml file of Harbor helm for its integration with Harbor. This can be achieved using bitnami helm chart from this link - PostgreSQL helm

4) High available Redis :โ€‹

Harbor helm chart don't deploy Redis HA cluster and we need to pass IP address in values.yaml file of Harbor helm for its integration with Harbor. This can be achieved using bitnami helm chart from this link - Redis Helm

5) PVC that can be shared across nodes or external object storage :โ€‹

I will be using NFS as shared storage device across nodes. Along with this I will configure NFS dynamic Provisioner for automatically creating PV on demand on the NFS.

Now lets discuss on details of POD's created using Harbor helm chart:โ€‹

I did not enabled harbor-exporter for now.

1) harbor-chartmuseum -โ€‹

Harbor support storing helm chart along with docker Image. Incase you don't require helm chart support in your private Harbor repository you can disable this using harbor helm chart.

2) harbor-core -โ€‹

Harbor Core is one of the main components of Harbor. It interacts with redis cluster. So, incase redis cluster integration is not successful this pod will not come up and in turn harbor-jobservice pod will not come.

3) harbor-jobservice -โ€‹

Harbor jobservice is one of the main components of Harbor. This is the last pod to come up in all the pods of helm chart.

4) harbor-nginx -โ€‹

Nginx container is itself a Reverse Proxy in front of the core and the portal containers. If Harbor is exposed as Ingress, then nginx pod is not deployed.

5) harbor-notary-server -โ€‹

Notary server is used for signing and verifying images. It is a optional pod and can be disabled used values.yaml in Harbor Helm charts. This is used when you want to sign you image while pushing. Developer enable content trust and export server details. export DOCKER_CONTENT_TRUST=1 and export DOCKER_CONTENT_TRUST_SERVER=https://IP_ADDRESS:4443

6) harbor-notary-signer -โ€‹

Notary Signer cordinates with notary-server for signing image.

In the next post I will be configuring NFS-Dynamic provisioner which will create PV's on demand for PVC's created by Redis, PostgreSQL and Harbor Helm chart-
Kubernetes Dynamic Provisioning - Persistent Volume on demand (Using helm charts)

Post 04 - PostgreSQL High Availability deployment on Kubernetes

ยท 5 min read

In this post I will be covering details of deployment of PostgreSQL High Availability on Bare Metal VM's. This article is part of series of Harbor High Availability

  1. Harbor High Availability deployment on Kubernetes
    Post 01 - Harbor High Availability deployment on Kubernetes\

  2. Kubernetes Dynamic Provisioning : Persistent Volume on demand (Using helm charts)
    Kubernetes Dynamic Provisioning - Persistent Volume on demand (Using helm charts) \

  3. High available Redis (Using helm charts)

  4. High available PostgreSQL database (Using helm charts) (this post)

  5. Harbor High Availability deployment in action on Kubernetes using helm chart.

PostgreSQL is an open source object-relational database known for its reliability and data integrity.

Prerequisite

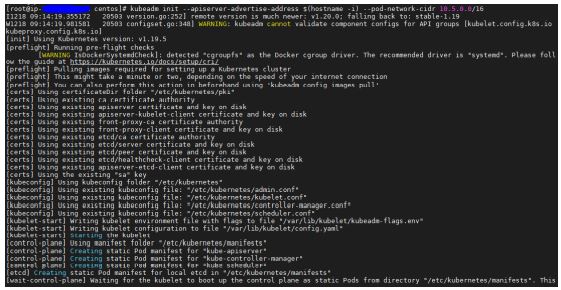
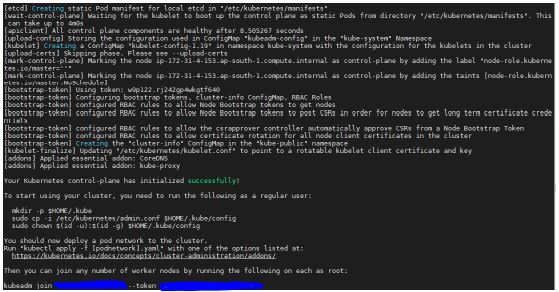
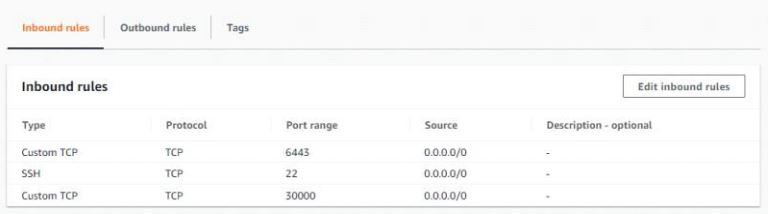
  1. Kubernetes cluster is up and running. To know how to achieve this read my previous post bootstrap kubernetes using kubeadm.
  1. NameSpace with name harbor-private-registry is already existing. If its not created run:

$ kubectl create ns harbor-private-registry

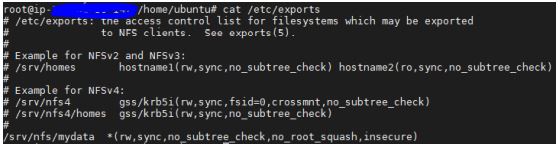
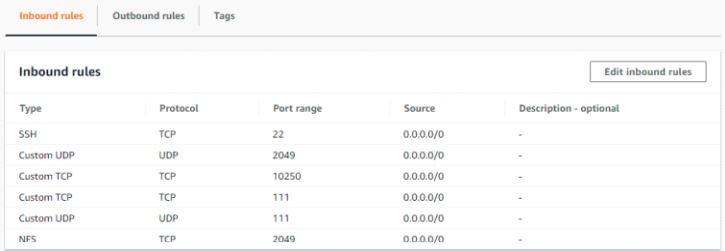
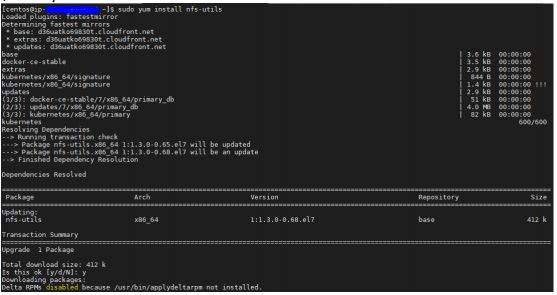
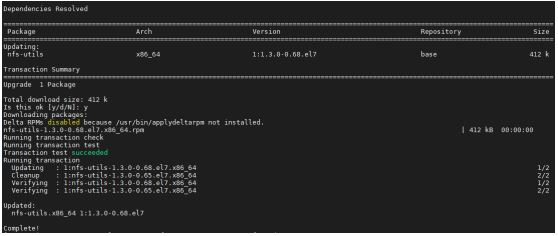
  1. Dynamic Volume Provisioning NFS is working and able to create pv on demand.

Using helm chart for PostgreSQL High Availability cluster

We will be using bitnami helm chart for deploying High Availabilty PostgreSQL cluster - PostgreSQL helm

We need to modify values.yaml file or override below values using --set flag while installing helm:โ€‹

--set pgpool.replicaCount=2

--set postgresql.replicaCount=3

--set postgresql.existingSecret=postgresql-harbor-secret : Name of secret created to store postgreSQL and repmgr password

--set pgpool.adminPassword=MTk5MCRwb3N0Z3Jlc3Fs

--set pgpoolImage.tag=4.2.2-debian-10-r72

--set postgresqlImage.tag=13.2.0-debian-10-r77

--set global.storageClass=nfs-client : Value (nfs-client) is name to storageClass created with NFS Dynamic Provisioner.

--set service.type=ClusterIP

Note : Creating below Secret is important else you wont be able to reattach existing pv on next uninstall and reinstall of postgreSQL helm chart due to any reason.โ€‹

Important Steps to create Secret (don't miss this)โ€‹

Create secret for configurable parameter of bitnami postgreSQL HA Helm chart values.yaml postgresql.existingSecret

Create secret using below command and then install postgreSQL using helm chart:

You will get below output on successfull installation of helm chart:


NAME: postgresql-harbor-private-registry
LAST DEPLOYED: Fri May 15 12:19:43 2021
NAMESPACE: harbor-private-registry
STATUS: deployed
REVISION: 1
TEST SUITE: None
NOTES: \

Please be patient while the chart is being deployed

PostgreSQL can be accessed through Pgpool via port 5432 on the following DNS name from within your cluster:

postgresql-harbor-private-registry-pgpool.harbor.svc.cluster.local

Pgpool acts as a load balancer for PostgreSQL and forward read/write connections to the primary node while read-only connections are forwarded to standby nodes.

To get the password for "postgres" run:

export POSTGRES_PASSWORD=$(kubectl get secret --namespace harbor-private-registry postgresql-harbor-private-registry-secret -o jsonpath="{.data.postgresql-password}" | base64 --decode) To get the password for "repmgr" run:

--command -- psql -h postgresql-harbor-private-registry-pgpool -p 5432 -U postgres -d postgres

To connect to your database from outside the cluster execute the following commands: *psql -h 127.0.0.1 -p 5432 -U postgres -d postgres *


Once the pods are up and running exec into postgreSQL stateful set pod and run *psql -h 127.0.0.1 -p 5432 -U postgres -d postgres *

Enter the password you get from *kubectl get secret --namespace harbor-private-registry postgresql-harbor-private-registry-secret -o jsonpath="{.data.postgresql-password}" | base64 --decode *

Create following database for harbor. Tables will be created automatically when Harbor HA starts

CREATE DATABASE notary_server;

CREATE DATABASE notary_signer;

CREATE DATABASE harbor_core;

postgres-# \l (this will list all the database)

Architecture of helm chart deployedโ€‹

Images used while deploying this helm chart:

1) bitnami/postgresql-repmgr :โ€‹

PostgreSQL is an open source object-relational database known for its reliability and data integrity. This solution includes repmgr, an open-source tool for managing replication and failover on PostgreSQL clusters.

2) bitnami/pgpool :โ€‹

Pgpool-II is a PostgreSQL proxy. It stands between PostgreSQL servers and their clients providing connection pooling, load balancing, automated failover, and replication.

After you deploy PostgreSQL HA using helm chart it will deploy two Pod's of pgpool and three pods of postgresql-repmgr pgpool is a deployment and postgresql-repmgr is a stateful set.

This will create one master and two slave cluster where Pgpool will be responsible for promoting slave to master incase master goes down.

Master (pod/postgresql-harbor-postgresql-0) will be single point for write operation where as master and two slaves (pod/postgresql-harbor-postgresql-1 and pod/postgresql-harbor-postgresql-2) will be three point for read operation.

pod/postgresql-harbor-pgpool-23243g54f8-afdsc
pod/postgresql-harbor-pgpool-11834437d4-ojgfd
pod/postgresql-harbor-postgresql-0
pod/postgresql-harbor-postgresql-1
pod/postgresql-harbor-postgresql-2

Two Cluster IP service will be created and one headless service.

PGPool pod's can be reached through pgpool cluster IP service and postgreSQL pods communicate to postgresql service.

For integration with harbor HA pass Pgpool Cluster IP as PG internally communicates to postgreSQL master and slave using headless service.โ€‹

In the next post I will be deploying Harbor Helm and details of Integration with Redis and PostgreSQL cluster -
Kubernetes Dynamic Provisioning - Persistent Volume on demand (Using helm charts)

Post 02 - Kubernetes Dynamic Provisioning, Persistent Volume on demand (Using helm charts)

ยท 3 min read

In this post I will be covering details of configuring NFS dynamic provisioner on Bare Metal VM's. This article is part of series of Harbor High Availability

  1. Harbor High Availability deployment on Kubernetes
    Post 01 - Harbor High Availability deployment on Kubernetes \

  2. Kubernetes Dynamic Provisioning - Persistent Volume on demand (Using helm charts) (this post)

  3. High available Redis (Using helm charts)

  4. High available PostgreSQL database (Using helm charts)
    Post 04 - PostgreSQL High Availability deployment on Kubernetes \

  5. Harbor High Availability deployment in action on Kubernetes using helm chart. \

This article can also be used to configure NFS Dynamic Provisioning even if you are not installing Harbor High Availability.โ€‹

Prerequisite

NFS server is up and running.

Read my previous post to create NFS server and bootstrap kubernetes using kubeadm.

What is NFS dynamic provisioning

NFS dynamic provisioning allows PersistentVolume to be created on demand. There can be multiple storage class within a Kubernetes cluster which provide dynamic provisioning.

One option is we have default storage class configured for the cluster and each time a PVC is raised a PV is automatically created. Storageclass can be marked as default using annotations under metadata.

annotations: storageclass.kubernetes.io/is-default-class=true

Other option is we have multiple dynamic provisioner configured and each time a PVC is raised it should be mentioned in yaml which provisioner user want to use to create underlying PV. This can be achieved through mentioning storageclass in the yaml.

Usually each cloud provider provides a Volume plugin which is used as provisioner in storageclass yaml to define where underlying PV will be created for PVC on demand.

Using helm chart for dynamic provisioning

Default values of helm chart which are modified:

storageClass.reclaimPolicy : Default value is "Delete", incase if you want to retain the pv for future use override this value to "Retain". This will help to reclaim the obsoleted volume For instance you have a statefulset and you reduce the number of replica. Then again increase the number of replicas the old pv will still be lying and will automatically be attached with the new increased replica.

storageClass.archiveOnDelete : default value is true, which will result in archiving the pv data lying on NFS server.

Above two overriden values will help to retain data with pv incase you uninstall and reinstall a same helm chart.

replicaCount : Increasing replica count to 3 for high availability. Which defaults to 1.

storageClass.accessModes : default value is ReadWriteOnce(RWO). Other posssible values are ReadOnlyMany(ROX) and ReadWriteMany(RWX) ReadWriteMany should be used when you want multiple pods(lying on multiple nodes) to write on same pv. NFS, CephFS and Glusterfs only supports all three types of access modes.

Run $kubectl get sc

You should be able to see storage class with name nfs-client.

Using --kubeconfig parameter as I am installing helm chart from powershell from my Windows laptop on remote kubernetes cluster.

Test automatic PV creation on NFS server*

Create below PVC and check if underlying PV is created on NFS server automatically

Run $ kubectl get pv, pvc

Above command will show PVC created from above yaml and underlying pv. Go to the nfs server on mount directory and one can find underlying pv folder.

NOTE This usecase was implemented was done on bare-metal cluster.

Bootstrap Kubernetes cluster with PV as NFS

ยท 2 min read

Create three ec2 instance

Master node : centos
Worker node: centos
NFS server : ubuntu

Steps to create NFS Server on ubuntu instance

Make sure you have below inbound rules for NFS client to ping to NFS server and mount directory on client-server

Setup Master node (control plane) - Install Docker and Kubernetes (kubeadm, kubectl, kubelet)

Add below Inbound rules with masternode of kubernetes cluster

Setup Worker Node

Install Docker, kubeadm, kubelet and kubectl as done in above steps for master node

  1. Login to worker node

  2. Add below inbound rules on worker nodes (Without adding port TCP/UDP 2049/111 you won't be able to mount worker node on NFSdirectory)

  1. Run token which you got from kubeadm init command: $ kubeadm join 1X2.3X.4.XXX:6443 --token XXXXXXXXXXXXXXXXXXXXXXX\ --discovery-token-ca-cert-hash sha256:XXXXXXXXXXXXX

  2. $ sudo yum install nfs-util

  1. mount -t nfs :/srv/nfs/mydata /mnt
  2. mount | grep mydata

Create PV, PVC and POD's to Use NFS server as underlying storage:

  1. Login back to master node

  2. Run $kubectl get nodes (this should list one master and worker node as Ready)

Create default nfs-storageclass.yaml

Create nfs-pv.yaml file with below contents

Create pvc.yaml

Create nfs-deployment.yaml

Any file created on location /usr/share/nginx/html will be backed up on NFS server location /srv/nfs/mydata

NOTE ** Contents of yaml can be found at TechSlaves Repo: deployment-pv-nfs **